Wednesday, October 21, 2020

Double the Marine Corps, double the fun

 
So Jaime contacted me to have a gift customized for a certain Marine she knows, a chrome bullet pen with a letter opener and a nice desk kit to store them in. It started with printing the USMC flag, adhering them to the tubes and trimming the edges. We mixed up some acrylic and into the pressure pot it went.

First attempt was half-successful. The pen blank had no issues. The larger tube for the letter opener (left) couldn't take the pressure in the pot, so what you see is a partially-submerged tube in solidified acrylic. The rubber seal leaked, letting acrylic fill inside the tube. Thankfully, it was pretty easy to clear out and scrape off to try again.

Second time was the charm for the LO.

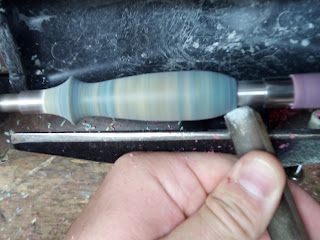
Here are the two pieces mounted on the lathe, ready for turning. I made a short video of their progress, below. Next step is producing the desk box, hopefully in the next blog post.


Thursday, September 24, 2020

Kevin part IV, a New Hope

Turning

Shaping

Shaping

Fine shaping with a skew

Sanding

Hand sanding

Fine sanding

Wet sanding

Plastic polish

Wax

Assembly tail

Assembly head


Kevin part 3, the revenge of Kevin

Measure and cut

Drill

Paint and glue tubes

Turning begins

Roughing

Shaping

Fine shaping with skew

The sanding begins

Each step sanded lengthwise as well

So. Much. Sanding.

Wet sanding with Micromesh

Plastic polish

Wax

Assemble the tail

Assemble the head


Friday, September 11, 2020

Kevin part 2

 Today I turned the upright to one of two stands for Kevin's project.

Roughing with a carbide gouge.

Shaping.

Fine shaping with a skew.

Sanding at 100 grit.

After each level of sanding, I stop turning to sand the blank lengthwise to remove perpendicular scratches.

I sand at 100, 150, 220, 320, 400 and 600 grit (above), stopping to sand lengthwise each time. 

Wet-sanding with Micro Mesh pads. The lowest grit is about 8000 and there are about 10 steps going up to 32000 grit. The water keeps things cool.

The piece is dried and wiped clean.

This friction polish activates by heat.

A second coat of wax and polish dries and is then removed.

The metal setting is inserted into the brass tubes on a pen press.


Thursday, September 10, 2020

Kevin part 1

Kevin and I have been in correspondence for a while now, planning razors with stands as gifts for his brother and dad. I (finally) started working on them.


First, the matching pieces are measured and cut. The stands are about 1/8" longer than the shave handles.


Each piece is drilled at 7mm to accommodate the brass tubes. Here the blanks are drilled on the lathe, which turns the blank against the steady drill bit. 


The holes are then painted white. Since the acrylic has translucent swirls, the paint will help disguise the brass tube and reflect light back out, accentuating the blanks' brilliant colors.


After the paint dries, the tubes are epoxied in place.


Wednesday, May 13, 2020

A red herringbone

So my old friend, Dave, contacted me out of the blue to commission an order and help out small businesses affected by the pandemic. Class move, man. You're awesome.

He also dropped a challenge. He wanted creativity. He wanted different. He wanted difficult. Hmmm. What about herringbone? says I. Let's see, says he. And so it began.

It had been a while since I'd made a herringbone from wood. Now I remember why. It's not that it's particularly difficult. It just requires the patience of Job.


It starts with wood selection, marking and numbering. To make a herringbone pattern pop you need some contrasting shades, though the client specifically asked for darker woods. From top to bottom are bloodwood, Burmese teak, kolohala, and cocobolo.

The marks? Oh, that ... Each blank will be cut into 1/4" squares. The shortest blank produced 13 squares. Four blanks times 13 squares each is 52 squares. Each of the 52 squares must be sanded on 5 of its 6 sides (I leave the numbers on). That's 260 passes on the sander. Plus, each must be as close as possible in thickness to its brothers and sisters, so many (most) must be sanded to depth, compared with its peers and possibly (probably) sanded again. We have now exceeded my ability to math. My level of anal retentiveness requires that I re-align the wood grain wherever possible, hence the numbers. Hey, pimpin' ain't easy.

I tried several layouts and patterns with these woods, looking for the most aesthetically pleasing combination. This is an early draft before sanding.

So far, I've produced three herringbone blanks. The one on the left uses all four woods, the one in the middle uses three. That one in the clamps? Three new woods. Yes, that means I did that measuring, cutting and sanding again. Because masochism, that's why. Oh, and can we talk about the clamps for a minute? See, you don't want gaps, so you want to clamp your glue work in two directions. Because of the herringbone pattern, if you apply pressure one way, guess what happens in the other direction? Let's just say that it's good there are no elementary schools within earshot of the workshop, because the profanity had volume in both quantity and decibel level. Let's not even discuss the amount of glue on my hands...

The climax? Watching in what feels like slow motion as the blank succumbs to the pressures of 1200 RPMs and being drilled, exploding and casting pieces into the vacuum, onto the table and who knows where else. Don't worry. I was able to dig through the dust and garbage in the vacuum to find all the missing pieces.

I'll be fine. Really.